I have lots of computer students who want to listen to music on their computer or just add music to a PowerPoint slide show, but they grew up with Sony Walkmans not iPods. If you are like me, you have a huge collection of CDs gathering dust in your entertainment unit. (The old unit that fit the 36″ TV, right?)
Here is a quick tutorial to turn your old CDs into your digital music library.
CDs are Permanent – More or Less
I have not had the best luck buying music online. Sure, you can buy one song for a $1, but what happens when you get a new computer? Where does the music go? In my experience, I have bought songs, even albums on iTunes, played them for years, then had the songs disapear when I upgrade my computer. The picture of the album, aka, “album art,” is still there, but no songs! When I have reached out to iTunes, it was like talking to a ‘bot, so I no longer buy their music.
I have had better luck buying songs on Amazon. Again, it is about $1 per song, but if there is an issue, I can download the song again from my Order>Digital Orders. Sometimes their music still does not transfer to a new computer, but at least I can download it again from my account.
My preferred method? I buy the CD. That way I have a physical copy of the music in case it “gets lost.”
The problem nowadays is that most computers do not come with a CD player. They are always trying to reduce the size of desktop PCs or reduce the weight of laptops. The answer? For less than $25 dollars (at least in 2022), you can buy an external CD/DVD player. Yes, it also plays movies! I love this one that I found on Amazon. It has the USB cable built in and a little place to store it! It is fairly lightweight, and I have been using it for about two years now, including packing to and from computer classes.

So you have your favorite CD and an external CD drive plugged into your computer (or your computer has a built-in “internal” CD/DVD drive). Now what?
How to Copy or “Rip” a CD?
In computer talk, “rip” a CD means to make a digital copy of the music to your computer. There is also “burn” a CD which means to make a new CD from an audio file on your computer.
CD > Rip > to Computer
Computer > Burn > to CD
I did ask a friend of mine, a sound man from the music industry, if those were music terms, and he said, “No.” So it is just geek talk.
Back to “ripping” music. Put your CD in your CD drive. Be sure it is plugged in to a powered on computer, or the “open” or “eject” button will not work – usually a little light will appear. Find that button and push it to open the drive. Place the CD inside with the CD words or art facing the top. In my computer’s vertical CD/DVD drive, I had to try both ways to figure out which way was up. Push the button or push in the drive so it is inside your computer.
Also, be sure you have an internet connection. Once you computer finds your CD, it will look it over then go out to the internet to find the official album name, album art, artist name, and song list. (I have no idea how it knows any of this; I just know that if you are not connected to the internet it does not work – it will say “unknown album,” “unknown artist,” etc.)
The next steps should appear on your screen, with step by step instructions. If not, you can always eject and reinsert the CD.
You may get a little Auto-Play pop-up in the bottom right corner of your computer saying your computer found the CD/DVD, but I recommend you ignore that for now.
Open Windows Media Player
Open Windows Media Player on your computer. Find the Windows Search magnifying glass in your Taskbar and start typing “Windows Media Player” in the search bar. Click on the Windows Media Player icon to open the app.
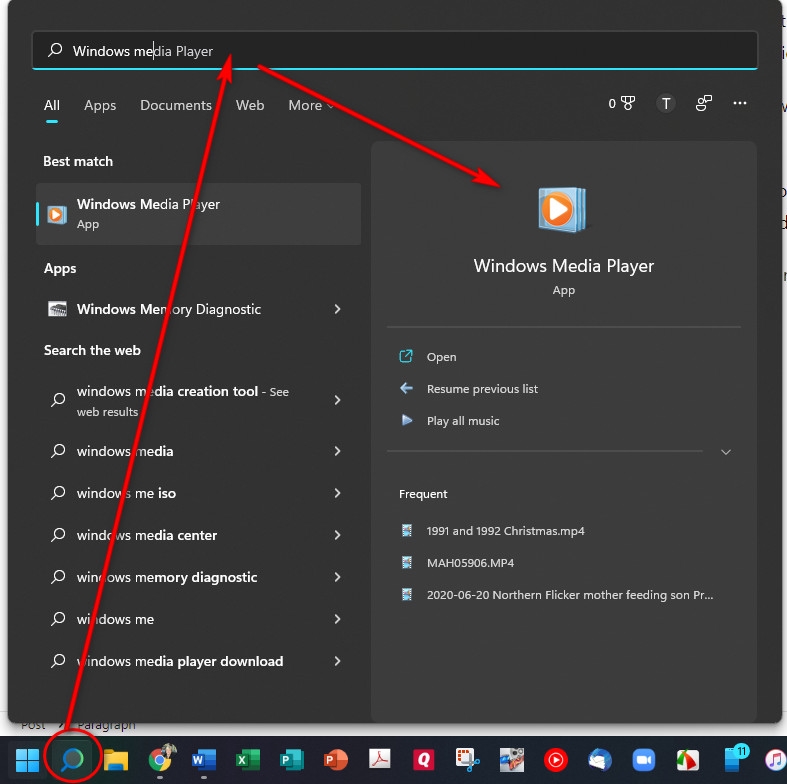
Windows Media Player may open up right to the CD by showing the album, or it may not. If you do not immediately see the album art, click on the album name in the Navigation Pane on the left. The album may start as “unknown album,” but as soon as your computer reaches out to the internet, it will know the name of the album, artist, each song, and hopefully find the album cover art.
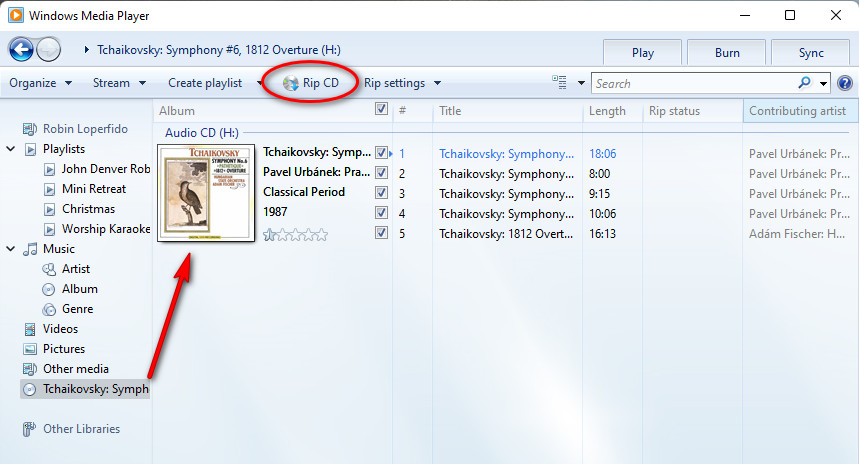
Start the Rip
In the menu tabs of Windows Media Player, find “Rip CD.” Just as a precaution, look at the little checkbox to the right of Album, just under Rip. Be sure that is checked to make sure you are going to “rip” the entire album/CD rather than just one checked song.
Click “Rip CD” and your computer will start making a digital copy of all the songs. Notice in the screenshot above that all the songs are selected. You could transfer or “rip” just one song by deselecting all but one. There are select or deselect checkboxes just below the “Rip Settings” tab.
Once you click “Rip CD,” your computer will take it from there. You may watch the progress or minimize Windows Media Player. Depending on the number and length of songs, it could take five to ten minutes to transfer all the CD.
Each song will show “Ripped to Library” when it has completed creating the digital file.
Where Did My Music Go?
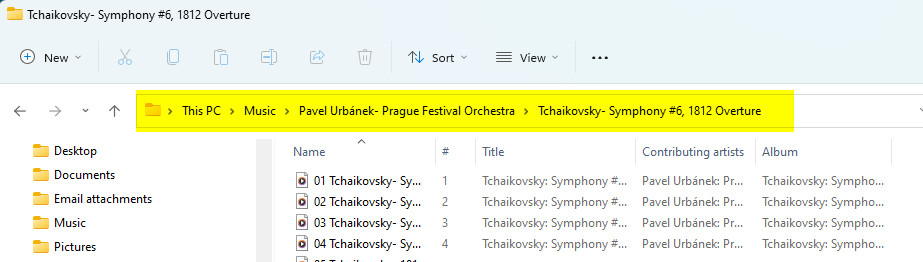
The nicest things about Windows Media Player is that it happily knows just where to put your music. Every PC has a built-in Desktop, Documents, Downloads, Music, Pictures, and Video folders. Find the Music folder on your left Navigation Pane of File Explorer. (If it is hiding, find “This PC” first, then locate the Music folder.) After the “Rip CD” is complete, open your computer’s Music folder.

Almost every music player, such as Windows Media Player, rips the music in the same way and location. After your “rip” a CD, look inside your Music folder. There will be a folder for the artist. Double click to open that artist’s folder. There is a folder for that album. Double-click the album. There is file for each song. Click one song and your default music app will play that song. You can see the “path” through those folders in the screenshot below.
Once you have the song file, you can import to PowerPoint or synch to your phone. The song is in your library. (Copyright laws vary, but usually when you buy the CD, you have the right to use the song for personal listening… NOT business use. Check copyright laws and support your favorite artists by buying their music!)
Can My Music App Find the Song?
Some apps create their own folder within the Music folder, so you may see an iTunes folder or Amazon folder depending on your previous music purchases. Most apps will search your Music folder, aka, music library, for new songs when they start up. If not you may need to “scan for new music.” That will be up to your preferred app’s settings. Your app’s instructions will take it from here!
