Sometimes you are uploading an image, like a profile picture, to a website, and the website tells you the image is too large – huh? Sometimes you want to email a picture of your garden to some friends, and your email software says the image is too large – huh again?
Our phone camera and regular cameras now take very clear images. These photos are saved in pixels: the pixels are the tiny little dots of color, black or white that our eyes see, your brain translates into a recognizable image. You’ve heard of the new 4K TVs, right? That means there are more than 4,000 pixels or dots filling your image – just across the top line! The more pixels, the denser the image, and the better it looks. That is why new technology likes a “high-resolution” or hi-res image! If you want to print an 8×10 of a photo, you can stretch the image with lots of pixels into a bigger size, and it will not “pixelate” or show all the little squares of color. Remember the old dot-matrix printers? They made letters with little dot patterns. Pixels are the same thing.
What does this have to do with compressing an image? Websites and email clients have limited storage. Back in the early days of digital photography, it was great if a camera took a 5 “megapixel” image. That means an average 5 MP photo has five-million little pixels (dots) in each photo. Our new 20 MP photos have about twenty-million pixels. Those images take up more memory or storage, so the websites and email don’t want them! They want you to “compress” your image.
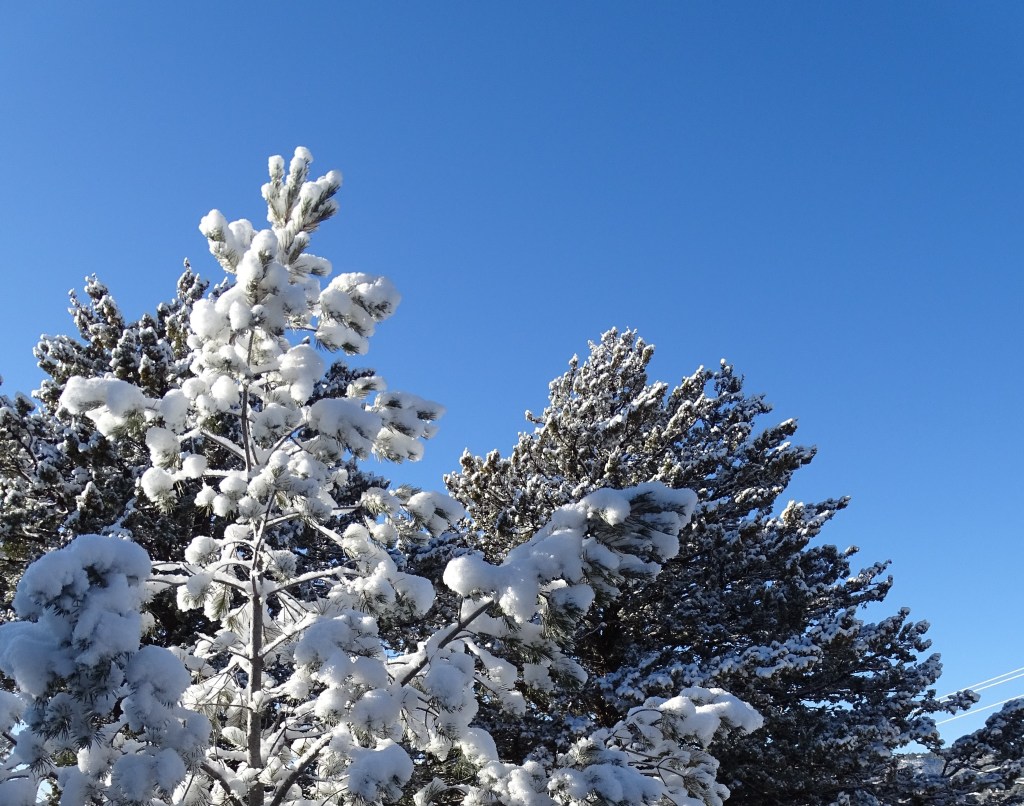
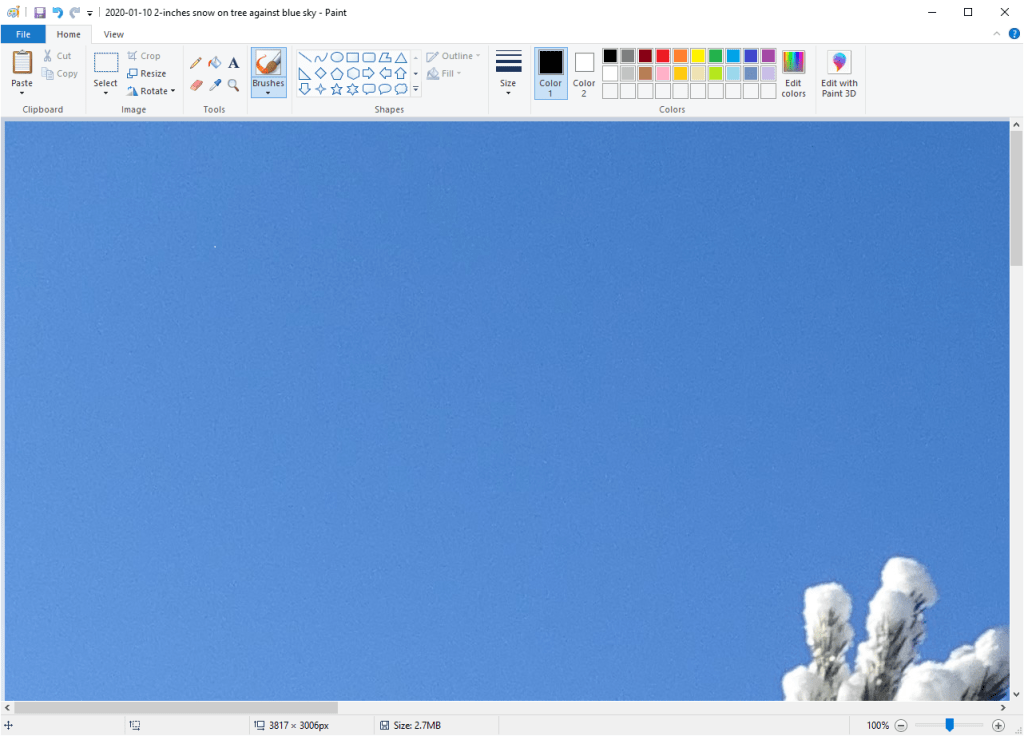
Look at this photo of a tree in winter with the bright blue sky. The file takes up 2.720 KB (kilobytes or thousand-bytes) of space.
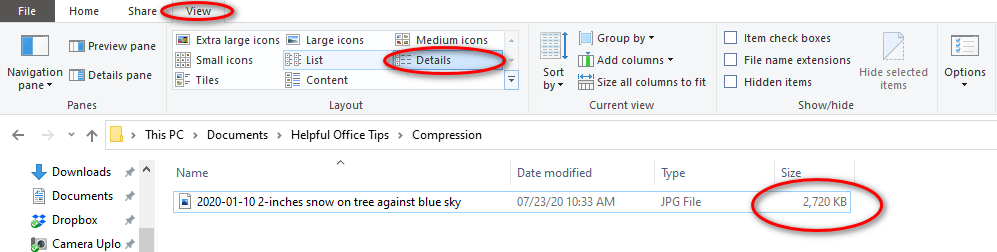
Here are the details in File Explorer. To view details, open File Explorer>View tab>Layout section>select Details.
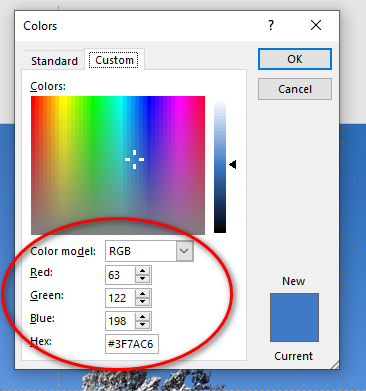
Let’s say I want to email this image or have it be my new profile picture. How do I make it more manageable for a website or email? I compress the image. This means that most of the blue sky will be one command for the computer to read, say “from this pixel to that pixel” make it a certain color blue. The computer doesn’t really know what a color is, but it knows to turn your monitor a certain value of ‘red green blue” (RGB) for each pixel. The main part of our blue sky has the “RGB Value.” Here is a screenshot of the color in PowerPoint to illustrate this. (You do not have to get this, but I thought it might help.) This blue is Red=63, Green=122, Blue=198. When the image is compressed, it tells it to use that color from the top left to the bottom right of that blue area. For certain “white snow” values, it does the same thing. Those commands use much less memory than going “blue, blue, blue, blue…” and so on for pixel after pixel.
Now that you understand what compressing an image means, how do you do it? First, for uploading a smaller image to the internet, you can simply “resize” the image with Windows Paint, image editing software built into Windows. This will shrink the image down in size. The other method is to actually compress the big image using the Compress command in PowerPoint. This blog will show you how to resize an image with Windows Paint. For PowerPoint, go to this blog: Compress an Image in PowerPoint.
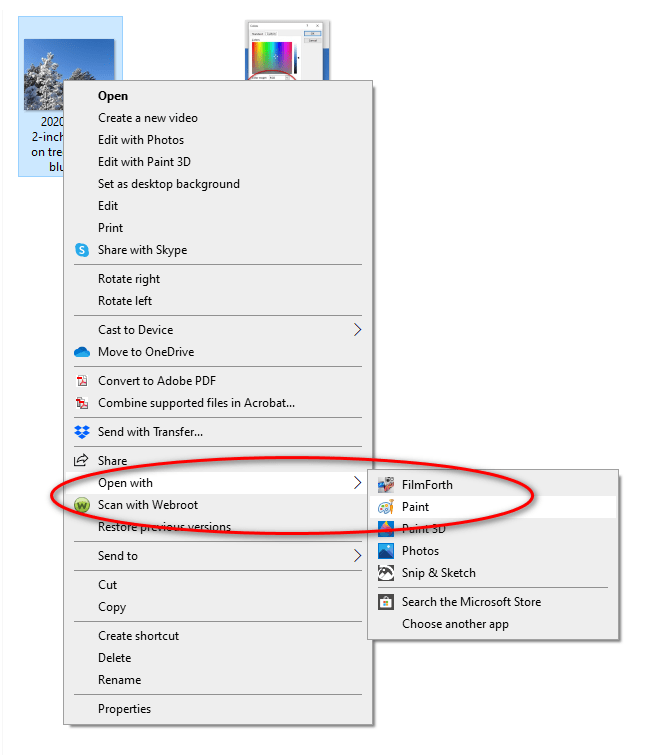
Find an image you want to resize in File Explorer. Right-click the image, and the right-click menu pops up. About two-thirds of the way down, you will “Open with…” Hover you mouse over “Open with…” Windows will give you several choices of programs you can use to open your image file. The default or automatic software is usually Windows>Photos which is best for cropping or changing the light settings of photos. Instead of the default, select “Paint.” Paint was an early image software to could draw or “paint” on the computer. (It’s great for kids.)
When you open the image in Paint, it will probably be huge! Your image will fall off the edge of the Paint Window. That is because Paint was created when images were 2 MP or 3 MP, not 20 MP (megapixel).
Don’t worry, we are going to “Resize” the image, which will take up much less storage space. In Paint’s menu click on Home tab>Image section>Resize. The Resize choices will appear. Notice that we can resize by percentage or pixels. Also notice that the “Maintain aspect ratio” will be checked. That means if you shrink the picture from top to bottom, you will also shrink the picture from left to right. The image will stay in proportion.
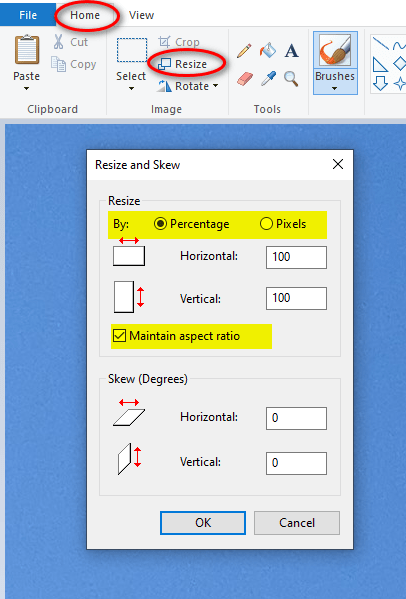
Change the Horizontal box from “100” to “25.” The Vertical box will also change to 25. Now click OK. The picture will shrink to 25% of the original. We do not want to save over the original, so do not use File>Save. Instead save this smaller image with Paint’s menu File>Save As… Find the correct location/folder in your Save As window. For the name, add the words “Smaller” to the image so you remember which one is which. Click Save and Paint will save your new 25% smaller image to your computer.
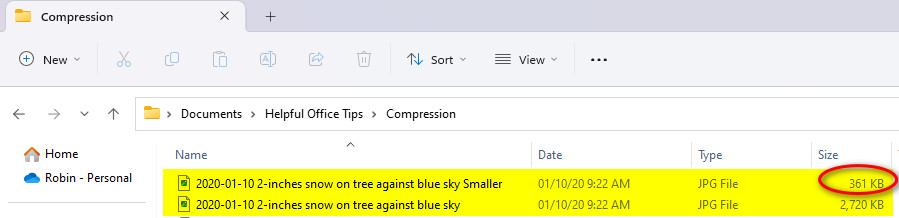
Let’s look at the details now. Choose in File Explorer>View tab>Layout>Details. Look at the difference in the size column between the original picture and the smaller image.
Now you can send the smaller image via email or upload it to a website with no problem. Should you use the smaller image to create a beautiful, clear 8×10 image or an even bigger poster? No. The image will be pixelated – which means you will see little jagged lines instead of straight lines. Here is an enlargement of the top of the tree in our smaller image so you can see the pixelation. See the difference?
Remember you can always take a high-resolution image and shrink it. You cannot take a shrunken image and make it high-resolution.
In our next blog, we will compress an image using MS PowerPoint: Compress an Image with PowerPoint.

This is not compression, this is resizing. Compression would allow the resolution to stay the same while reducing filesize.
LikeLike
You have a good point. Thank you for catching that. I have revised the post and added a new post on using Compress Pictures in PowerPoint.
LikeLike