Publisher was created for Desktop Publisher. Microsoft pays their designers to create samples just for you, their subscriber. Do you want to create an inspiration flyer? A newsletter? Mailing labels? A postcard?
You could go through and measure the labels, create the margins, columns and guides, but I recommend you let Microsoft do it. Then you can expend your energies on the creative design rather than the measurements.
Select and Create a Template
When you open a new document in Publisher, the Publisher>Home screen appears. Besides blanks for portrait (8.5” x 11”) and landscape (11” x 8.5”) pages, there are other templates to the right.

Click on “More Templates” to see their ideas. You can type a specific template in the search bar or select one of the choices below. There are also “Suggested searches” under the search bar.

Let’s use a “quarter-fold” Invitation as an example. Type the word “quarter” in the search box on Publisher’s New page, and press Enter.

This is the perfect template for making quick inexpensive greeting cards, such as a birthday card for your grandchildren! (I always keep some 24 lb heavyweight bright white printing paper around just for these.)
Select the thank you card with the sun. We will start with the portrait (tall) format instead of the landscape (wide) format, but you can easily change it later. You can double-click or click the card once, then click “Create” in the window that pops up.
Publisher creates a quarter fold, four-page greeting card for you. Look at the Pages pane on the left. There is a front page numbered “1.” Two inside pages, numbered “2” and “3.” And a blank final page, numbered “4.” Click through each page to look them over. Here is a screenshot of the inside of your card.

Page Setup
Let’s see how the page is setup from the Page Design tab. We will start with the Page Design tab>Page Setup section>Size drop-down. Remember, the actual paper size is still “Letter” paper which is 8.5” x 11”, but we will be folding the final version of the card into fourths: in half, then in half again. That is defined as 1/4 Letter Side Fold. You can also make half-folds and top-folds. Often I will decide on the fold by the image I want to use.

What are the margins? (Page Design tab>Page Setup section>Margins drop-down.) This template has a “moderate” 0.5” margin on each side of the pages. Each fourth is setup with 0.5” margins.

Since we selected the tall Portrait version rather than a wide Landscape version, Page Design tab>Page Setup section>Orientation drop-down is set to Portrait.
If you ever wanted to change your Page Setup, you simply change the templates settings to suit your needs.
Edit and Customize Your Template
Page 4 Byline
To get you in the swing of things, let’s add a byline on the back of the card first. Click on Page 4 in the Pages pane. Insert a Text Box that stretches from one blue margin line to the other, starting around 4” and going to the bottom right of the margins. Within your Text Box type, “Made for you by” and press Shift-Enter. (Shift-Enter adds a single space between lines instead of a new paragraph.) Add your name or “Mom,” “Dad,” “Sis.” The more personal, the better.
Now center your text in the middle of the Text Box using the Text Box tab>Alignment section>Align Center. (Be sure your Text Box is selected of the “magic” Text Box tab will not appear. This centers your text vertically and horizontally within your text box. The font is automatically selected by the template. We may change it later, but for now, just make your “byline” one or two sizes smaller. (You don’t want to draw attention from the front of the card, right?

Center and Reduce Font Size
Page 1 Cover
Click back to Page 1 on the Pages pane. We are going to start from scratch so use one of these methods to select then delete “All” the objects on Page 1.
- Drag through the entire page so that everything is selected.
- Press Ctrl-A to select “All.”
- Home tab>Editing section>Select drop-down>Select All Objects.
Press Delete to remove everything from Page 1. The other pages are not affected.
(Some objects may be on the “Master” page. Adding or deleting items on the Master page will add or delete those objects to every other page. To remove them, go to View tab>Views section>Master Page. Select All, then Delete.)
Insert a nice photo that fits the sentiment of the card. I love using photos of the flowers in my garden, so I will insert an iris. Adjust the size and/or crop your photo so it fits nicely between the margins of your card.

Insert a Text Box from one margin to the other at the to of the card. Type your cover greeting one your card. Be sure to make it personal with a name. Try out the Text Box tab>Text section>Text Fit drop-down>Best Fit to expand your text to fit your card! Now center your text within your Text Box it as you did on Page 4. You can adjust the size of the Text Box and your text will adjust to it’s “Best Fit.” Make it on a single line, by raising the middle bottom handle of the Text Box.
Match the color of your font to your image with the “Dropper” tool. Always select your text first BEFORE you make any changes. From the Home tab>Font section>Font Color drop-down, select the dropper icon. Your cursor will change into an eyedropper or “dropper” cursor. Click and drag the dropper over a nice dark color in your image. You will see a sample of the color in a box about the dropper. Once you find the color you like, release the mouse. Your font will match your image color exactly.
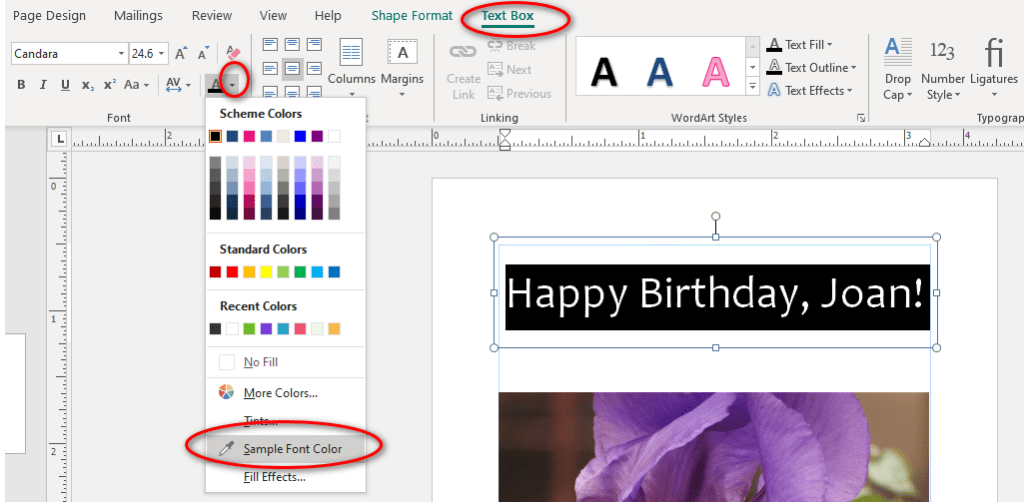
(You can also put your Text Box right over your image and pick a light or dark color so that it matches and covers part of the image. Be sure the Text Box’s Shape Format>Shape Outline drop-down is set to “No Fill.” That will keep the Text Box background transparent, so you can see your image.)
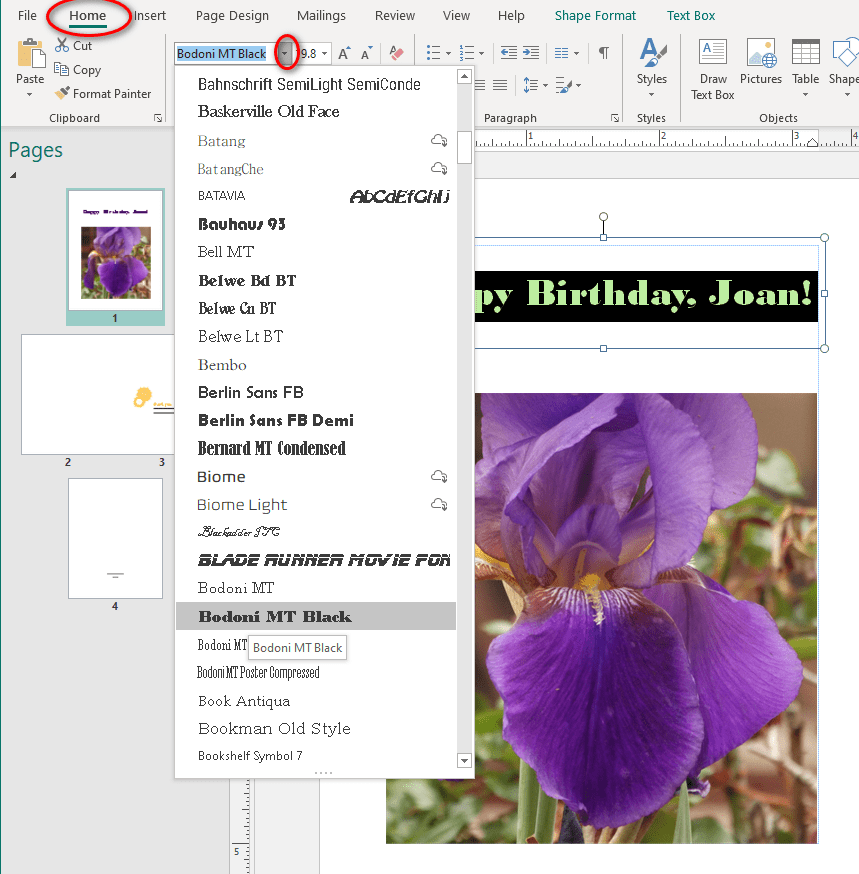
Change your font to something that looks nice and befits the occasion. Be sure your greeting is still selected within the Text Box. All the font are listed alphabetically in their font style from the Home tab>Font section>Font drop-down. Pick a bold font that is legible, aka easy-to-read.
Once your font is just right, play with the size or Text Box size to make an attractive cover. I’m going to drag mine back down to the photo to make it on two-lines after all.
Pages 2 and 3 Inside Your Card
Use your Select All and Delete skills to remove all the objects from Pages 2 and 3. This is all your choice. Greeting card messages are usually on the right of the inside of the card. You can add another image to the left inside (Page 2) or simply type a greeting on the right. You can leave it blank for a handwritten card. It’s all up to you. Always leave room for a handwritten signature!
We’ll come back to add some finishing touches later.
Finishing Touches
We are going to go back to Page 4 now to really make it professional.
Drag through your text on Page 4 (or triple-click to select the entire paragraph). From the Home tab>Font section>Font drop-down, you will see the font we used on the cover listed on the top line just under “Recently Used Fonts.” I know I forgot what I selected, but Publisher remembered. Select that font.

(Important Tip: Professionally designed documents use at most two fonts. Beginners use five or six or more.)
Remember the dark color you used for the font on Page 1? Publisher does. With your byline selected, go to the Home tab>Font section>Font Color drop-down. The most recent color you used, our dark color from the dropper, will show up in the Recently Used section, with the most recent boxed on the left. Pick that color.

Practice this step by going back to your greeting on Page 3. Update the font and color, so it matches the rest of your card.

Pages 2 and 3
(Hyphenation Tip: If you typed a paragraph on Page 3 Publisher may have inserted hyphens automatically, which isn’t really want you want for your grandchild, right? To change the hyphenation settings, Publisher – Turn Off Hyphenation.)
Print Your Card
Go to File tab>Print for a print preview. The Print page will show the current settings for this template. Notice that Pages 1 and 4 are right-side up along the bottom and Pages 2 and 3 are upside down on top! If you are only seeing one page, your settings are not set to “Side-Fold, quarter sheet.” Look through your settings so that they are similar to the screenshot below, but with your printer showing. There is a checkbox at the bottom, reminding Publisher to save all these settings with your document.
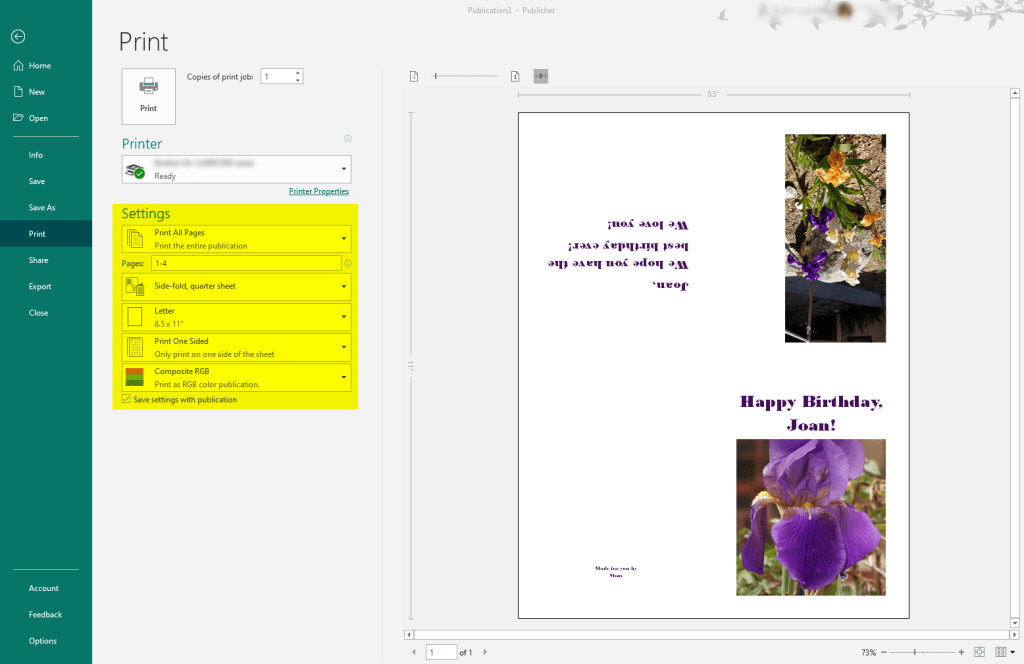
I mentioned earlier that I always keep some 24-pound, bright white paper on hand for greeting cards, flyers, or newsletters. For double-sided documents, like a newsletter, the ink does not bleed through. For greeting cards, it just makes the card a little thicker which looks nicer and “store-bought.” Load the good paper in your printer now and click Print!
Fold your printed card along the middle of the paper just above Pages 4 and 1. Now fold again into quarter-size so that Pages 2 and 3 are in the center. All the pages are facing the correct way now, just like a greeting card!
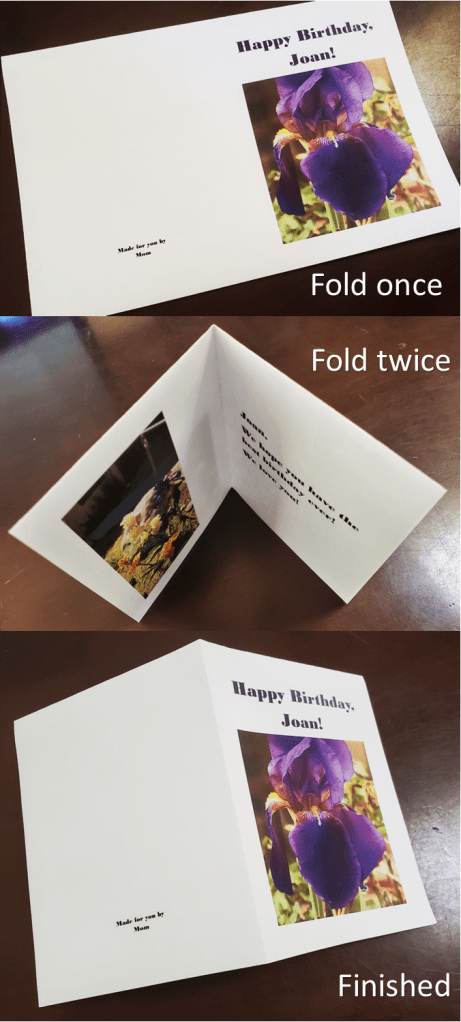
Don’t forget to sign your card with lots of XOXO.
Now drop it in an envelope or tape it to a package and you are all set!
(Did you know you can buy “Invitation Envelopes” at office supply stores like Staples which are made for quarter-fold cards?)
Save your greeting card on your computer and you can use this as your own template next time you want to make a card. Remember to use File tab>Save As… to give your card a new name.
Other Templates
Mailing Labels
From Publisher’s New page, click on Built-in to get more templates. Now scroll down to Labels. You can select Labels by specific brand and number, such as the ever-popular Aver 5160 labels (30 per sheet).

Publisher will just show you one label. You design it, then it will print 30 of these labels per sheet. Mail Merge is another topic for another day. You can read about using Excel and Word for Mail Merge in this blog: _https://helpfulofficetips.com/2013/11/27/use-excel-and-words-mail-merge-to-print-mailing-labels/. Publisher is similar.

Postcards
Some templates print two per page, like some postcards. Get one just right, then Select All, Copy and Paste below. If you need to make changes, delete the lower objects, make your adjustments, then Select All, Copy and Paste again.

Professional Printing
For professional printing, discuss your printer’s requirements before you start to design a postcard. For professional printing, always save your document as a PDF so that you do not lose your font design and information. PDF means “Portable Document Format.” A PDF file that looks just like the page printed on your printer at home, but you can send it via email or bring it to your printer on a USB drive.
To create a PDF in any Microsoft 365 or Office 365 product, click the File tab>Export. From there, simply click the button that says “Create PDF/XPS.” (XPS is Microsoft’s version of a PDF – ignore it.)

Then use the Save As… window to save your PDF.

Thanks for thiss blog post
LikeLike